

How to Install a Nugget Ice Maker in Your Kitchen: A Beginner’s Guide
Set up your chewable ice dream machine in just a few easy steps
So you finally got your nugget ice maker — the one that gives you that soft, crunchy, restaurant-style ice everyone loves. Now what? If you’re like me when I got my first machine, you might be wondering: how do I install this without messing it up or drilling holes in my kitchen? Don’t worry — whether your ice maker is countertop, undercounter, or plumbed-in, this guide will walk you through it step-by-step.
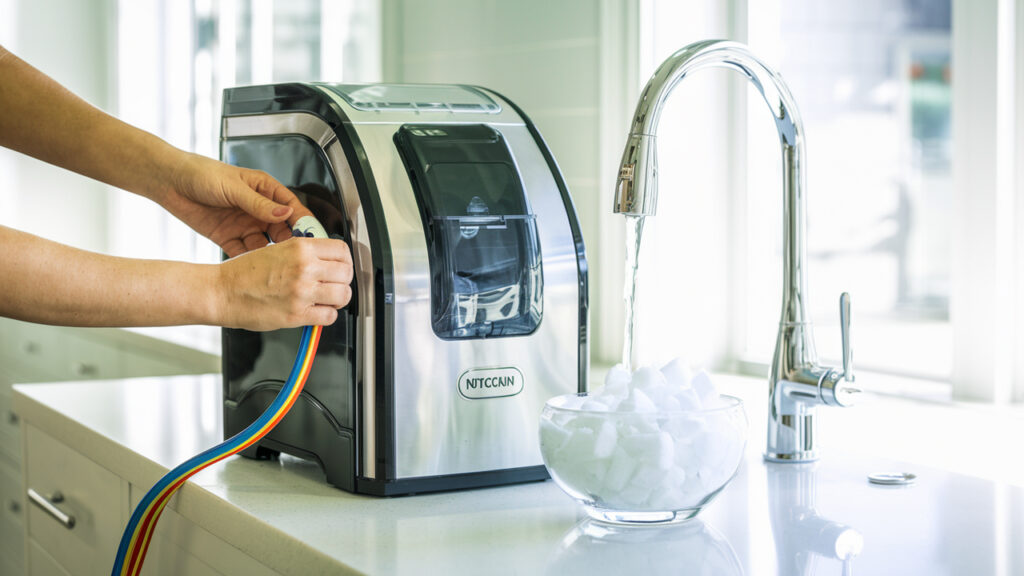
Table of Contents
Step 1: Know Your Ice Maker Type
Before anything else, you need to understand what type of nugget ice maker you have:
- Countertop (non-plumbed) – The most beginner-friendly. No plumbing required; just fill the water tank manually.
- Countertop (with optional water line) – Can be used manually or connected to a water line.
- Undercounter (plumbed-in) – Built-in models that require a water line and drainage connection.
If you’re in an apartment or don’t want to mess with plumbing, go with a countertop model like the GE Opal 2.0.
Step 2: Choose the Right Spot in Your Kitchen
You’ll want to place your nugget ice maker on a flat, stable surface, like a kitchen counter, beverage station, or cart. Make sure there’s at least 2–3 inches of ventilation space around the sides and back, especially if the machine has rear exhaust. Also check for a power outlet nearby — most machines need a standard 120V outlet.
Tip: Avoid placing your ice maker next to heat-producing appliances like ovens or stoves.
Step 3: Set Up the Water Source
If your machine uses a refillable water tank:
- Remove the tank (or open the top lid).
- Fill it with filtered or distilled water for best results.
- Reinsert the tank or close the lid securely.
If your machine connects to a water line:
- Shut off your cold water supply.
- Use the provided tubing and connectors.
- Connect the T-valve or water line splitter.
- Attach one end to the machine and one to the cold water pipe.
- Turn the water back on and check for leaks.
Always follow the manufacturer’s instructions — each model may have slightly different connection requirements.
Step 4: Plug It In and Power Up
Once the machine is in place and the water is filled (or connected), go ahead and plug it into a grounded outlet. Many machines will begin cooling immediately and start producing ice within 6 to 20 minutes depending on the model. Some machines may need a quick rinse or cleaning cycle first — check your user manual.
Step 5: Run a Cleaning Cycle First (Optional but Recommended)
Even brand-new machines can have dust or residue from the factory. I always recommend running a cleaning cycle with water and a bit of vinegar or ice machine cleaner before using it for the first time. Rinse with fresh water once or twice before making ice for drinking.
Step 6: Start Making Ice!
Once your machine is cleaned and ready, turn it on and let it do its thing! Most compact nugget ice makers will begin producing soft, chewable ice within 10–15 minutes and fill the bin over the next hour or two.
Keep the lid closed during operation for best performance, and don’t forget to empty the bin between uses if you’re not running it daily.
Step 7: Maintain Regularly
To keep your nugget ice maker running like new:
- Clean it every 1–2 weeks
- Use filtered water to prevent mineral buildup
- Drain excess water if you’re storing it
- Use the self-cleaning cycle if your machine has one
A little maintenance goes a long way toward making your machine last for years.
Final Thoughts
Installing a nugget ice maker in your kitchen is easier than you might think. Whether you’ve chosen a simple countertop unit or a built-in model with a water line, just follow the steps above and you’ll be enjoying that perfect chewable ice in no time.
Got a favorite machine or still shopping? I recommend checking out top-rated models like:
One of the things I really appreciate about nugget ice makers is that most of them are plug-and-play. You don’t need to hire a plumber or electrician unless you’re dealing with a built-in model. For countertop machines, it’s as easy as setting up a coffee maker — which makes it perfect for beginners or renters.
If your machine has a side water tank, like the GE Opal 2.0, it’s worth filling it fully so the machine can run longer without refilling. These tanks usually last all day, and they help reduce interruptions in ice production. Just make sure the tank is firmly connected and free of air bubbles.
Want to go the extra mile? Use distilled or reverse osmosis water to extend your machine’s lifespan. Hard tap water can leave mineral deposits over time, which may clog the internal system or affect the taste of your ice. Filtered water = cleaner machine + better ice.
Also, always check the ambient room temperature where you install your machine. Nugget ice makers work best in rooms between 50°F and 90°F (10°C–32°C). If your kitchen gets too hot (especially near a window or stove), it can affect how fast and how much ice is produced.
Another helpful tip: keep a small ice scoop nearby. Most machines don’t include one, but it’s more hygienic and convenient than grabbing ice by hand — especially if multiple people are using it. You can store the scoop right on top of the lid or in a drawer next to the machine.
Lastly, don’t forget to register your machine’s warranty once installed. Many manufacturers offer 1–2 year warranties, and registering ensures you’re covered in case of any early issues. Some even offer extended coverage when bought through Amazon or paired with a protection plan.
If you’re planning to use your nugget ice maker daily, it’s a good idea to set a simple weekly maintenance routine. I personally wipe down the exterior, check the water level, and make sure there’s no scale buildup near the sensors. It takes just a few minutes and keeps the machine working flawlessly.
Finally, once your ice maker is up and running, don’t forget to experiment with how you use your ice. Nugget ice is perfect for iced lattes, cocktails, sparkling water, or even for filling a cooler before heading out. Having your own machine at home opens up a whole new world of refreshment — and once you have it, you’ll wonder how you lived without it.
One thought on “How to Install a Nugget Ice Maker in Your Kitchen: A Beginner’s Guide”